I recently tackled a project using OIDC for authentication in a Vue 3 application. It proved to be trickier than anticipated due to limited documentation specific to Vue 3.
But you know that feeling of accomplishment after cracking a tough nut? That’s exactly how I felt after figuring it out! It was a challenge, but I persevered.
If you’re ever in a similar situation, or facing a knowledge gap with Vue 3 OIDC, this guide aims to empower you to achieve success faster and with less stress.
Streamlining Authentication in Vue.js Applications with OIDC and Zoho
Building secure web applications is paramount, and OpenID Connect (OIDC) has become a popular choice for authentication due to its ease of use and strong security. This guide will walk you through integrating OIDC into a Vue.js 3 application using Zoho as the identity provider.
Zoho, a well-known cloud software suite, provides a secure and reliable OIDC authentication service. This integration allows developers to effortlessly implement user authentication within their Vue.js applications.
Introducing OIDC: Streamlined User Authentication
OIDC, short for OpenID Connect, simplifies user logins for web applications. Built upon OAuth 2.0, it offers a standardized approach for users to authenticate with your application using an existing identity provider (IdP) like Zoho. This secure exchange of user identity information between the IDP and your application ensures a smooth and consistent experience across platforms.
In simpler terms, OIDC acts as an open standard. Users can leverage their existing login credentials from an IDP, like Zoho, to access your application. This eliminates the need for them to create separate accounts, enhancing convenience.
Getting Started with Vue.js
This guide assumes a basic understanding of Vue.js. However, if you’re new to the framework, don’t be afraid. Feel free to explore it at your own pace before returning to implement OIDC in your Vue.js application.
Integrating OIDC with Zoho as the Identity Provider
To leverage OIDC in your Vue.js application, you’ll need to configure Zoho as your identity provider. Here’s a step-by-step guide:
Zoho Developer Account: Head over to the Zoho Developer Console and create a new account if you don’t have one already. Existing users can simply sign in.
Register Your Application: Within the Zoho Developer Console, navigate to the “Clients” section and create a new client to register your Vue.js application. This process will provide you with a Client ID and Client Secret, which will be used later in your Vue application’s configuration.
Define Redirect URLs: Specify the authorized redirect URLs where Zoho can send authentication responses after a successful login. This URL should ultimately resolve back to your Vue.js application for seamless integration.
With Zoho configured as our identity provider, we can move on to the coding portion within your Vue.js application. To streamline the integration process, we’ll leverage a helpful library called vue-oidc-client. This is a Vue wrapper around oidc-client-js to help it work well with Vue.
Step-by-Step Integration in Your Vue.js Application
Now that we’ve configured Zoho as the identity provider, let’s delve into integrating OIDC within your Vue.js application. Here’s a breakdown of the steps involved:
Project Setup:
If you don’t already have a Vue.js project in place, you can create a new one using the Vue CLI or your preferred method. You can find detailed instructions on setting up a Vue project here
Install Dependencies:
To manage OIDC authentication, we’ll need some additional packages. Use npm or yarn to install oidc-client and vue-oidc-client:
3. Next, create a .env file for your credentials or secret
4. Create a config file to hold the settings config.ts
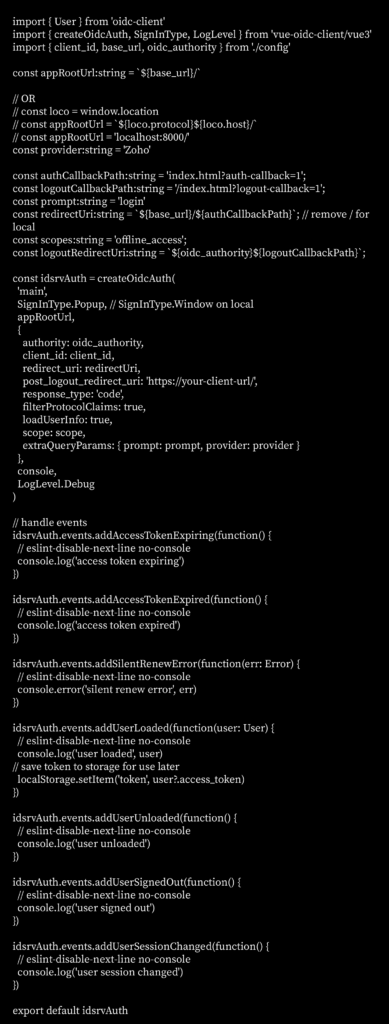
5. Implement the oidc service idsrvAuth.ts
6. Edit your main.ts file
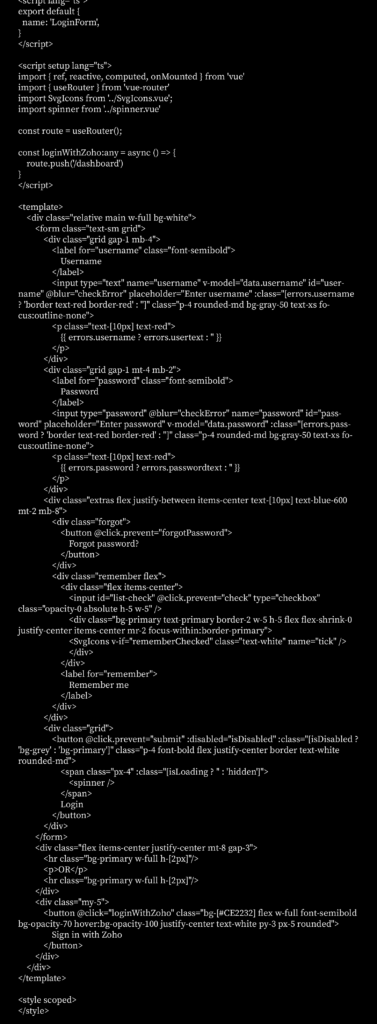
7. Finally, you can use your form like this loginForm.vue
In Conclusion:
Streamlined Authentication for Your Vue.js App
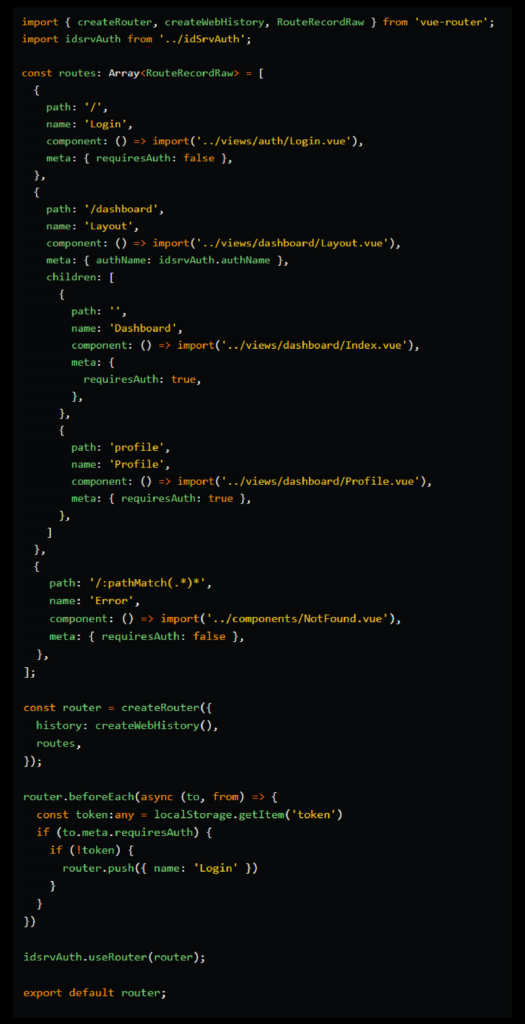
This guide explored integrating OIDC with Vue Router to establish a secure and user-friendly authentication flow in your application. While Zoho served as the identity provider in this example, the core concepts apply to any OIDC-compliant provider.
By leveraging OIDC in your Vue.js application and utilizing Zoho for authentication, you gain a robust and seamless user experience. OIDC’s standardized approach paired with Zoho’s reliable service ensures user data security while enabling convenient access across platforms.
Remember, this is just the foundation! Explore further customization options like managing user roles, accessing user information, and handling token expiration to tailor the OIDC integration to your application’s specific needs. Happy coding!
Useful article? Please share it with your followers: